


Chapter 7 A Tour of Canthology’s Features
7.1 Introduction
In this chapter, I provide a brief tour of Canthology’s features, so you can see how Canthology makes it easy to create professional-looking books. By the way, this is the longest chapter in the manual. Do not be put off by that, because more than half the content of this chapter consists of full-page diagrams that illustrate the output produced by Canthology.
7.2 The Starting-point Configuration File
The operation of Canthology is controlled by a configuration file that defines approximately 20 variables. It would be rather tedious if you had to assign suitable values for all of these variables before you could run Canthology. Thankfully, you don’t have to. This is because Canthology can generate a starting-point configuration file that provides you with sensible default values for most of the variables. This significantly reduces the time required to start using Canthology.
The following command instructs Canthology to create a starting-point configuration file called Canthology.cfg:
canthology -create Canthology.cfg
The contents of this file are shown in Figure 7.1.
 1  @include getenv("CANTHOLOGY_HOME") + "/etc/defaults.cfg";
 2  anthology1 {
 3      @copyFrom "book:a4";
 4      root_file {
 5          preamble = preamble + [
 6          ];
 7          base_name = "my-anthology" + macro.paperSizeSuffix;
 8          front_matter = [
 9              "\input{titlepage-template-1.tex}",
10              macro.tableofcontents,
11          ];
12          main_matter = [
13          ];
14          back_matter = [
15          ];
16      }
17      substitutions.search_replace_pairs = [
18          # search string          replace string
19          #---------------------------------------------
20      ] + substitutions.search_replace_pairs;
21  }
7.2.1 Default Values and Paper Sizes
Line 1 in the starting-point configuration file includes another file that contains many scopes,1 each of which provides sensible default values. (The @copyFrom statement in line 3 copies default values from one of those scopes.) The names of the scopes in the included configuration file can be constructed from information in Table 7.1 by concatenating the name of a column with a colon and the name of a row. Doing that yields scope names like book:letter, book:a5, report:a4, and so on.
Most of the columns (book, report, article, and so on) in Table 7.1 are names of popular LaTeX document classes. The only exception is memoir-article, which uses the memoir class, but adds some customisation to make that class suitable for writing articles.2
Most of the row names denote paper sizes: US Letter (letter) paper is commonly used in America, while A4 (a4) is commonly used in Europe and some other parts of the world.
A5 (a5) paper, which is half the size of A4 paper, is slightly larger than the size of a paperback novel. When writing a document that I expect will be read mostly on a computer screen rather than on paper, I format it for A5 paper because: (1) the small size makes it easy to read text on a computer screen without having to squint; and (2) two A5 pages can be printed size-by-side on a sheet of A4 paper, thus saving on paper.
The a5-trimmed row is similar to a5 except that most of the margins have been trimmed off. The intended use is to format documents for reading on a tablet computer (such as the Apple iPad or an Android device). Trimming unnecessary margins means the text of the document can be scaled up about 10% on the screen, thus making it easier to read.
The first four rows in Table 7.1 instruct Canthology to create a PDF document for the specified paper size.
The last two rows (html-one-page and html-many-pages) instruct Canthology to create a HTML document, either as a monolithic HTML page or as a collection of HTML pages. I will discuss the generation of HTML documents in Part IV. Unfortunately, the HeVeA tool used to convert LaTeX documents into HTML does not support use of the memoir document class.
7.2.2 Output Directory and File Name
Each of the scopes in the etc/defaults.cfg configuration file defines variables, including working_dir and macro.paperSizeSuffix. Table 7.2 shows the values assigned to these variables in the various scopes. For example, configuration scopes containing "a4" in their name (book:a4, report:a4, and so on) assign the value "output-pdf-a4" to working_dir and the value "-a4" to macro.paperSizeSuffix.
working_dir macro.paperSizeSuffix letter "output-pdf-letter" "-letter" a4 "output-pdf-a4" "-a4" a5 "output-pdf-a5" "-a5" a5-trimmed "output-pdf-a5-trimmed" "-a5-trimmed" html-one-page "output-html" "" html-many-pages "output-html" ""
The working_dir directory specifies the directory into which Canthology will create and copy files. The macro.paperSizeSuffix variable can be used to incorporate the paper size of a document into its file name.
Let’s resume our examination of the starting-point configuration file in Figure 7.1. As I previously stated, line 1 includes another configuration file that provides 26 scopes, each of which contains sensible default values.
Line 2 opens a configuration scope called anthology1 (the name of this scope is not important, so you can change it if you wish), and line 3 copies default values from the book:a4 scope into it.
As you can see in Table 7.2, the book:a4 scope assigns the value "output-pdf-a4" to the working_dir variable. Thus, the PDF file created by Canthology will be placed in a subdirectory called output-pdf-a4. Within that subdirectory, the name of the PDF file created by Canthology is obtained by appending ".pdf" to the value of the root_file.base_name variable, which is defined on line 7 of Figure 7.1. Thus, the generated PDF file will be output-pdf-a4/my-anthology-a4.pdf.
If you run Canthology several times on the configuration file, each time changing the name of the scope in line 3, then you will end up with the same document formatted for different sizes of paper. This can be useful if you intend to make the document available as a download from a website: Europeans will choose the A4-formatted version of the document, while Americans will prefer the US Letter formatted version.
7.2.3 Front, Main and Back Matter
As I explained in Section 4.3, LaTeX considers the contents of a book (technically, this means use of the book or memoir document classes) to be grouped into “front matter, “main matter” and “back matter”. The front_matter (lines 8–12), main_matter (lines 13–14) and back_matter (lines 15–16) variables are lists that specify text or commands to be added to those parts of the document. Most of the commands are likely to be \input commands to add contributions into the anthology.
The string on line 9 instructs Canthology to \input the file titlepage-template-1.tex at the start of the book. You do not need to create this file, because it is provided in the Canthology distribution. (Later, in Section 8.3.2, I will explain how Canthology searches for this file.) Line 10 makes use of the macro.tableofcontents variable (which is defined in the book:a4 scope from which default values were copied). The value of that variable causes a table of contents to be added to the anthology.
7.3 Running Canthology
To get Canthology to process the contents of its configuration file, you run the command:
canthology -f Canthology.cfg
The "-f" command-line option is used to specify the name of the configuration file. If you do not specify this option, then Canthology defaults to using the file Canthology.cfg. So, if your configuration file is called Canthology.cfg, then you can tell Canthology to process it by running the (shorter) command:
canthology
When you run Canthology on the starting-point configuration file shown in Figure 7.1, the PDF file produced contains a title page and a table of contents (which is empty because you have not yet added any chapters or sections into the anthology). The title page of the document is shown in Figure 7.2.
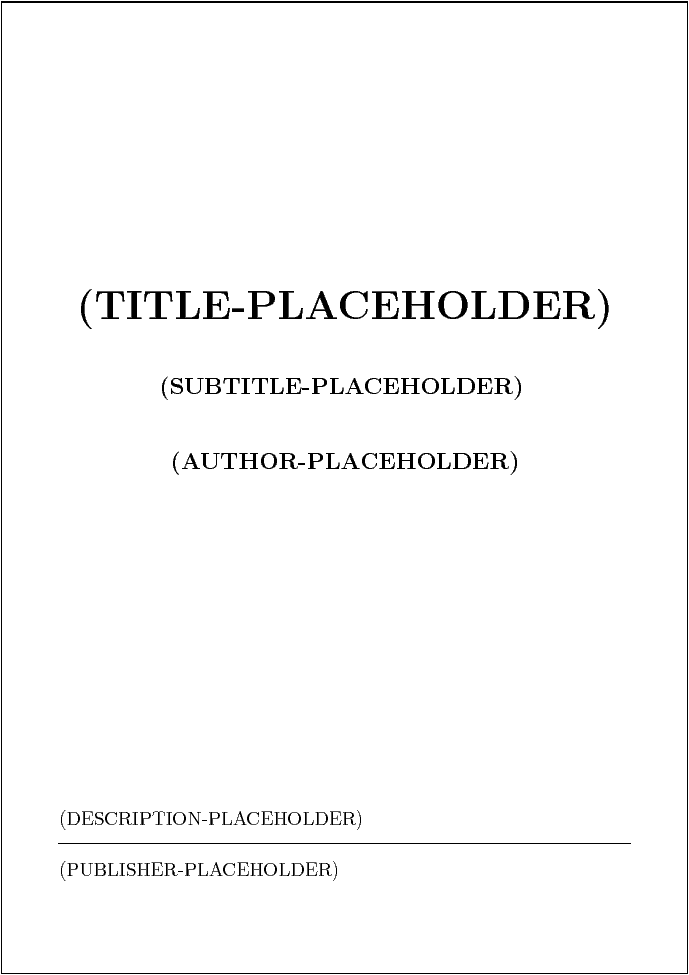
7.4 Text Substitutions on the Title Page
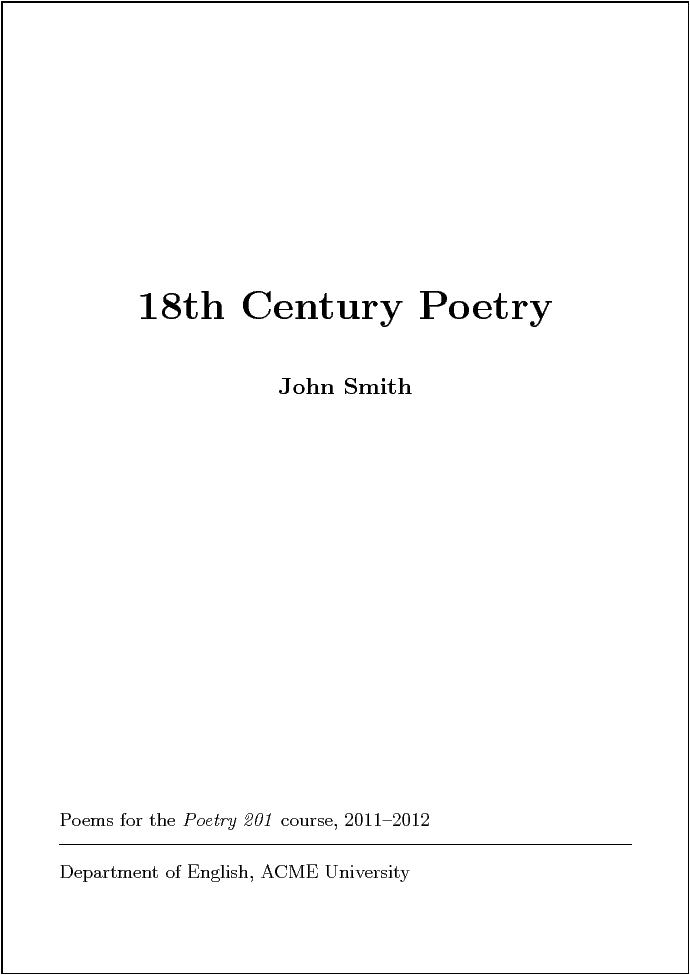
As you can see, the title page in Figure 7.2 contains five pieces of placeholder text. Obviously, you would like to replace those with text specific to the anthology you are producing. You can do this by editing the substitutions.search_replace_pairs variable in the configuration file, as shown in Figure 7.3.
substitutions.search_replace_pairs = [
    # search string               replace string
    #---------------------------------------------
     "(TITLE-PLACEHOLDER)",       "18th Century Poetry",
     "(SUBTITLE-PLACEHOLDER)",    "",
     "(AUTHOR-PLACEHOLDER)",      "John Smith",
     "(DESCRIPTION-PLACEHOLDER)", "Poems for the \emph{Poetry 201} "
                                  + "course, 2011–2012",
     "(PUBLISHER-PLACEHOLDER)",   "Department of English, "
                                  + "ACME University",
] + substitutions.search_replace_pairs;
Syntactically, the substitutions.search_replace_pairs variable is a list of strings. However, the strings are arranged to form a two-column table. Each row of the table specifies a mapping from placeholder text to the desired text. There are two points worth noting about this table:
- If you do not want some placeholder text, then you can specify "" as its replacement text. This is done for "(SUBTITLE-PLACEHOLDER)".
- The syntax of the configuration file permits you to break up a long string into two or more shorter strings and use the + operator to concatenate them.
Canthology performs substitutions in files whose names match the pattern form "*.tex"; in such patterns, * denotes zero or more characters. (Later, in Section 8.3.3, I will explain how to change this default behaviour.)
Having updated the substitutions.search_replace_pairs variable, you can rerun canthology. The updated version of the generated title page is shown in Figure 7.4.
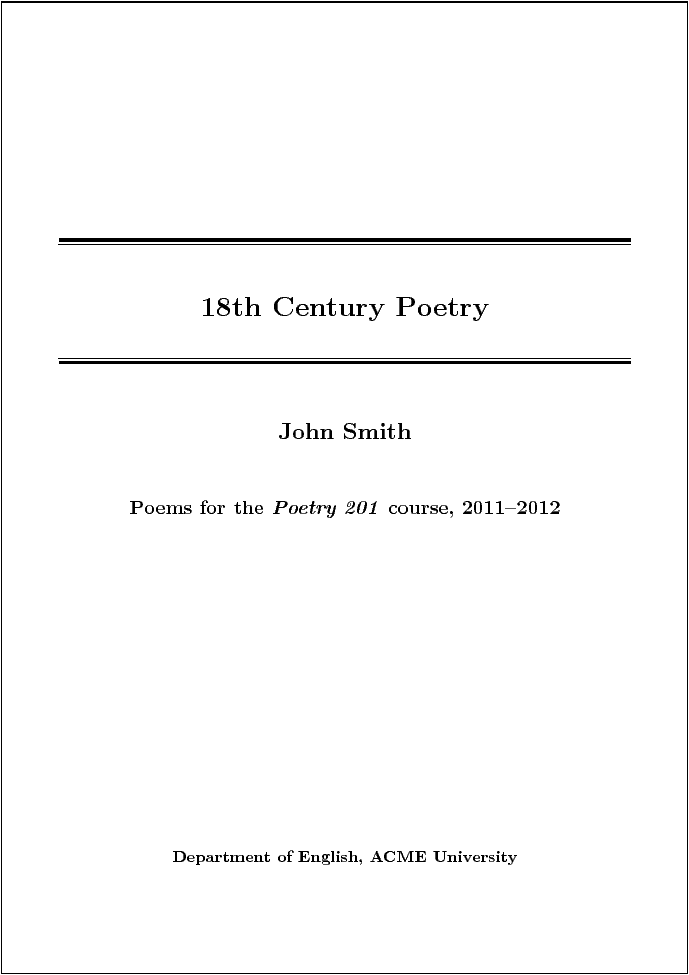
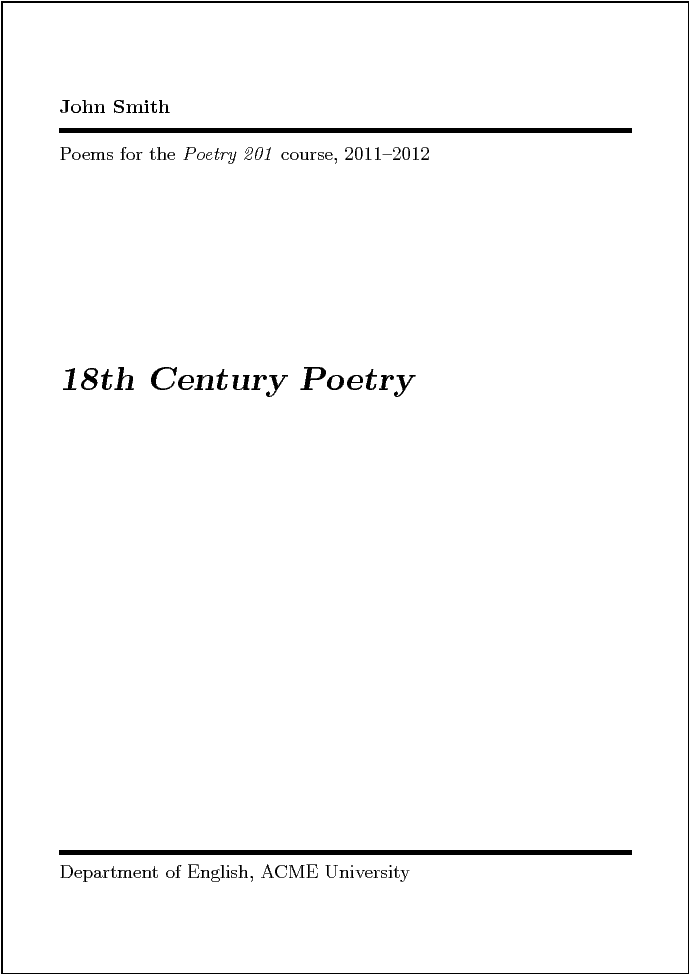
If you dislike the layout provided by titlepage-template-1.tex, then you can modify the configuration file to use titlepage-template-2.tex or titlepage-template-3.tex instead. The results of such modifications are shown in Figures 7.5 and 7.6.
If none of those title page layouts suits your needs, then you have a few more choices:
- Section 9.6 will explain how you can add colour or an image (such as a digital photograph) to the background of the title page. Perhaps doing that will be sufficient to give you a pleasing result.
- If you learn some LaTeX markup commands, then you can design your own title page instead of using one of the provided templates. (Later, in Section 9.2, I will recommend some useful books for learning more about LaTeX.)
- You might prefer to design a title page using a drawing editor. If so, you can save the drawing as, say, a JPG, PNG or PDF file, and then import that into LaTeX to use as your title page.
For the moment, let’s assume that the layout of the title page is good enough for your needs, so we can move on to the main content of the book.
7.5 Adding Content
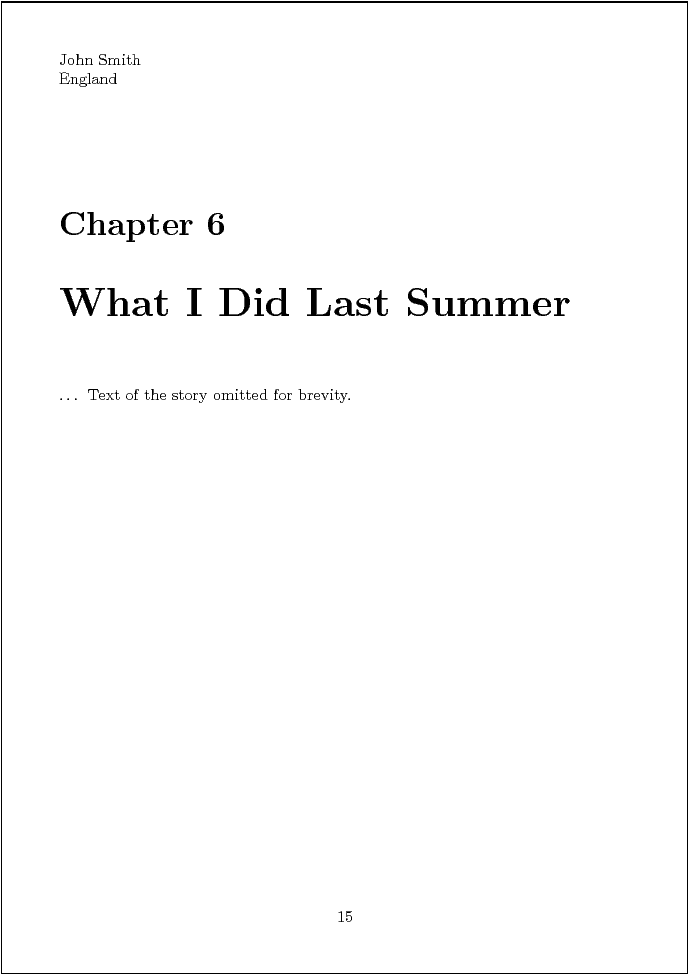
Let’s assume you have contributions in files whose names reflect the title of the contribution. For example, the file what-i-did-last-summer.tex might look like the following:
\chapter{What I Did Last Summer}
\chapterAuthorInfo{John Smith}{England}

... Text of the story omitted for brevity.
You can add those contributions to your anthology in a few simple steps.
- Copy the files into the same directory as Canthology.cfg so that Canthology can find them. (Later, in Section 8.3.2, I will explain how you can configure Canthology to find files located in other directories.)
- Modify the main_matter variable in Canthology.cfg (Figure 7.1) to have an \input command for each contribution.
- If your anthology has a large number of chapters, then you might want to group several chapters together to form a larger unit called a part. You can do this by adding a command of the form \part{ name} to the main_matter variable, where name is the name of the part.
Figure 7.7 shows an example configuration file that has been modified according to steps 2 and 3 in the above list; for your convenience, the \input and \part commands are shown in a bold font.
@include getenv("CANTHOLOGY_HOME") + "/etc/canthology-defaults.cfg";
anthology1 {
    @copyFrom "book:a4";
    root_file {
        base_name = "wasting-time" + macro.paperSizeSuffix;
        front_matter = [
            "\input{titlepage-template-1.tex}",
            macro.tableofcontents,
        ];
        main_matter = [
            "\input{introduction.tex}",
            "\part{Wasting Time in Education}",
                "\input{kindergarten.tex}",
                "\input{school.tex}",
                "\input{college.tex}",
            "\part{The Passing of the Seasons}",
                "\input{what-i-did-last-spring.tex}",
                "\input{what-i-did-last-summer.tex}",
                "\input{what-i-did-last-autumn.tex}",
                "\input{what-i-did-last-winter.tex}",
        ];
        back_matter = [
        ];
    }
    substitutions.search_replace_pairs = [
        # search string               replace string
        #---------------------------------------------
         "(TITLE-PLACEHOLDER)",       "Wasting Time",
         "(SUBTITLE-PLACEHOLDER)",    "",
         "(AUTHOR-PLACEHOLDER)",      "Jane Doe",
         "(DESCRIPTION-PLACEHOLDER)", "",
         "(PUBLISHER-PLACEHOLDER)",   "",
    ];
}
The indentation of \input commands after each \part command is not required. It simply provides a way to indicate the high-level structure of the anthology.
If you run Canthology on this configuration file, it will create a PDF file that contains a title page, table of contents, and eight chapters, most of which are grouped into parts. The generated table of contents is shown in Figure 7.8. Notice that use of \chapterAuthorInfo commands results in the name of each chapter’s author being listed in the table of contents.
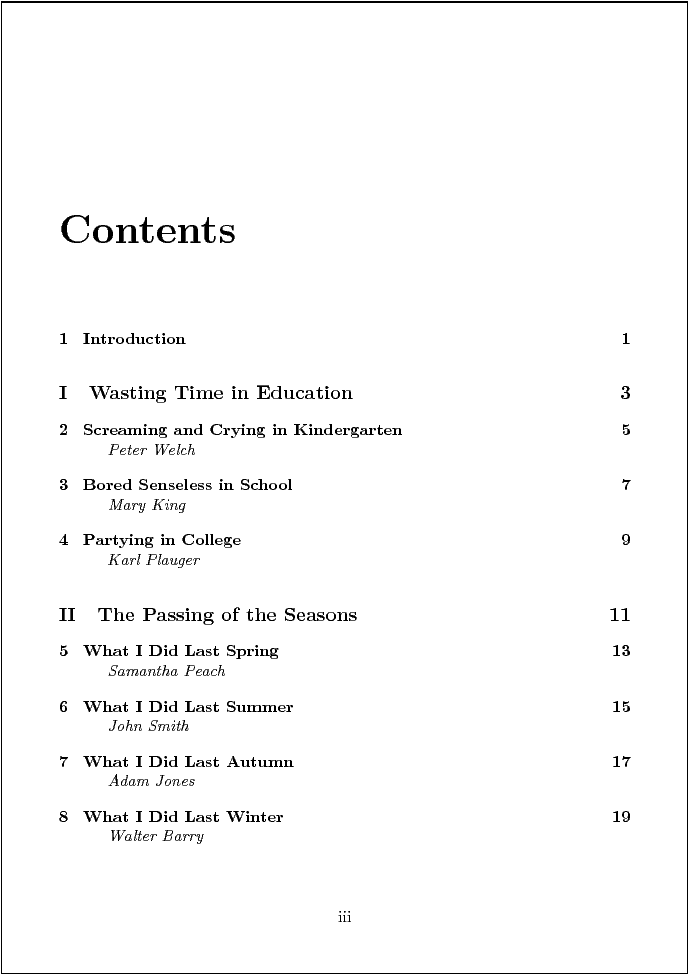
Each \part command results in the name of the part being listed in the table of contents. Each part is automatically numbered using Roman numerals (I, II, III, IV, and so on). In addition, the main body of the book will contain a page displaying a part’s number and name. An example of this is shown in Figure 7.9.
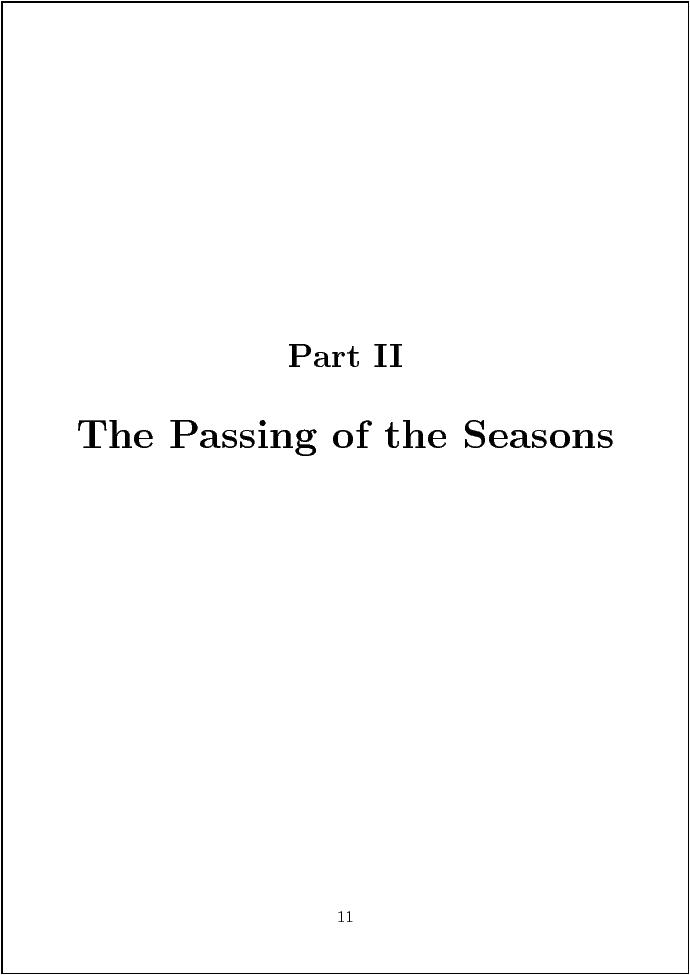
Figure 7.10 shows the starting page of a chapter. Notice that the use of a \chapterAuthorInfo command results in the name and personal details (such as age, location, or occupation) of the author appearing at the top of the page.
7.6 Front and Back Matter
You might want to put some additional material at the very start or very end of your anthology. For example, some books have a preface or forward at the start of the book, and some books have appendices or a glossary at the back.
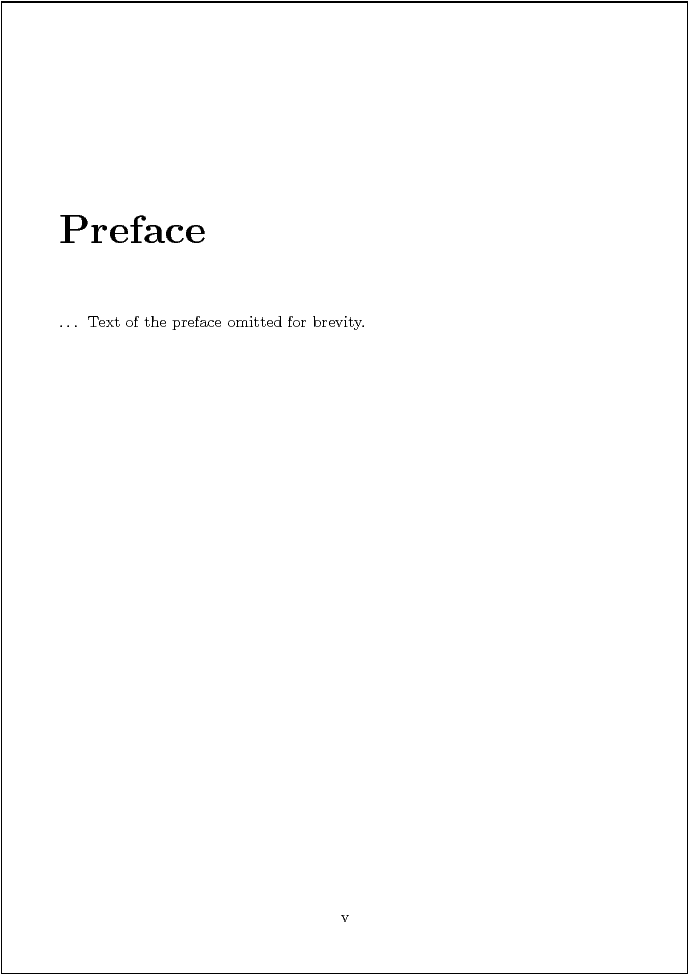
When writing a preface, foreword, appendix or glossary, you should write it in the same way that you write a chapter, that is, you start it with a \chapter command. For example:
\chapter{Preface}
... Text of the preface omitted for brevity.
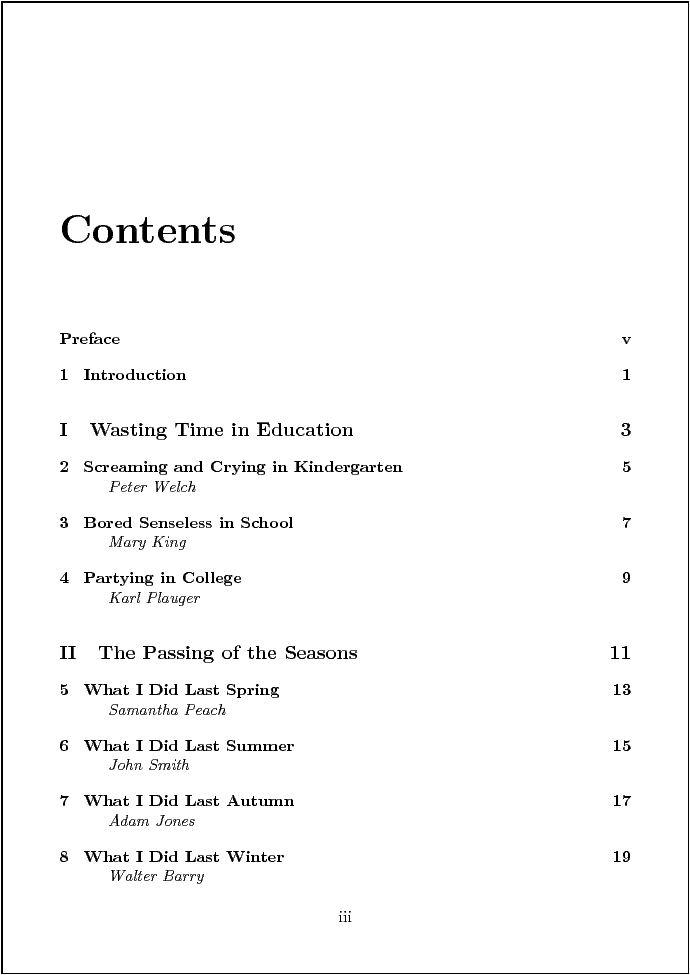
Figure 7.11 illustrates how to add a preface, some appendices and a glossary to your Canthology configuration file.
@include getenv("CANTHOLOGY_HOME") + "/etc/canthology-defaults.cfg";
anthology1 {
    @copyFrom "book:a4";
    root_file {
        base_name = "wasting-time" + macro.paperSizeSuffix;
        front_matter = [
            "\input{titlepage-template-1.tex}",
            macro.tableofcontents,
            "\input{preface.tex}",
        ];
        main_matter = [
            "\input{introduction.tex}",
            "\part{Wasting Time in Education}",
                "\input{kindergarten.tex}",
                "\input{school.tex}",
                "\input{college.tex}",
            "\part{The Passing of the Seasons}",
                "\input{what-i-did-last-spring.tex}",
                "\input{what-i-did-last-summer.tex}",
                "\input{what-i-did-last-autumn.tex}",
                "\input{what-i-did-last-winter.tex}",
            macro.startAppendices,
                "\input{statistical-tables.tex}",
                "\input{relevant-laws.tex}",
        ];
        back_matter = [
            "\input{glossary.tex}",
        ];
    }
    substitutions.search_replace_pairs = [
        # search string               replace string
        #---------------------------------------------
         "(TITLE-PLACEHOLDER)",       "Wasting Time",
         "(SUBTITLE-PLACEHOLDER)",    "",
         "(AUTHOR-PLACEHOLDER)",      "Jane Doe",
         "(DESCRIPTION-PLACEHOLDER)", "",
         "(PUBLISHER-PLACEHOLDER)",   "",
    ];
}
As you can see by focusing on the bold text, you add a preface or foreword to the front_matter variable in the configuration file, and add the glossary to the back_matter variable. Appendices are handled slightly differently: they go at the end of the main_matter and are preceded by macro.startAppendices.
If you now look at the generated table of contents in Figure 7.12, you will see that the preface and glossary are listed as unnumbered chapters. In general, chapters and sections in the front_matter and back_matter are unnumbered, while chapters and sections in the main_matter are numbered.
You can verify the unnumbered nature of a front-matter chapter by looking at the preface shown in Figure 7.13.
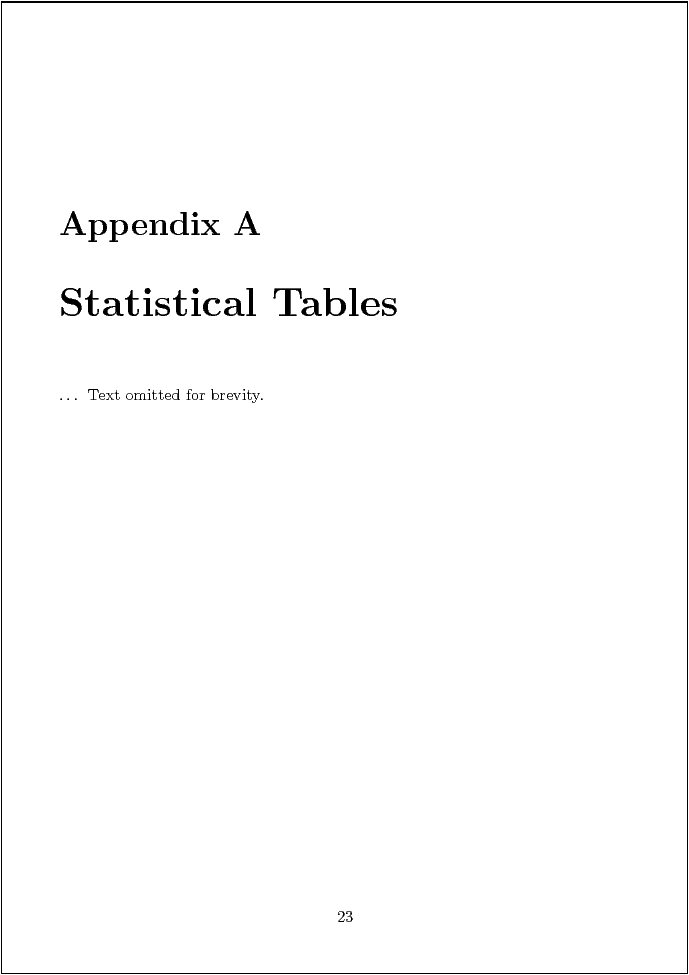
Appendices are placed in the main_matter so they can be numbered, but they are “numbered” with letters (A, B, C, and so on) rather than digits to distinguish them from chapters. The use of macro.startAppendices triggers this switch in the numbering convention and also causes a page to be generated that signals the start of the appendices (Figure 7.14).
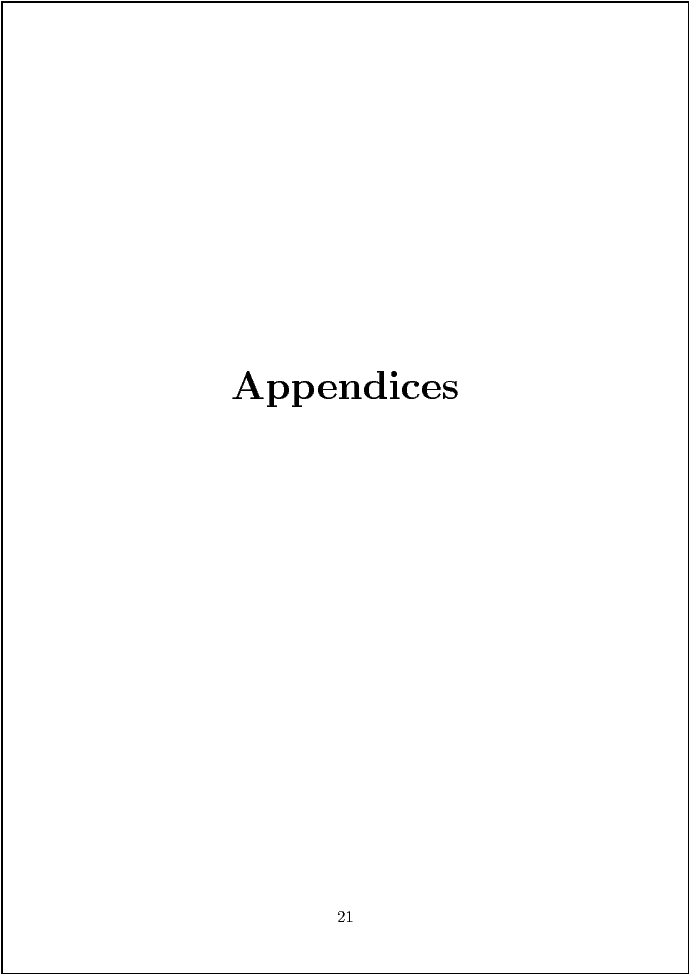
Figure 7.15 shows the formatting of an appendix.
7.7 Summary
This chapter has provided a rapid and somewhat superficial tour of Canthology’s features. Canthology and LaTeX take care of tedious tasks in typesetting a book, such as the layout of a title page, creating a table of contents, correct numbering of chapters and appendices, and ensuring chapters are unnumbered in the front and back matter. This frees you to focus on the contents and structure of the book.
The next chapter takes a deeper look at Canthology, so you can learn how to fine-tune its behaviour.
- 1
- Recall from Section 5.2 that a scope is a construct of the form "name { ... }".
- 2
- The memoir-article scope adds
the following two statements to the preamble of a document:
\counterwithout{section}{chapter} \pagestyle{plain}